EverQuest Live Map
A live map of everything around you: every NPC and player as a con-colored dot, with the view keeping up as you move and switching zones with you.
1. About the tool
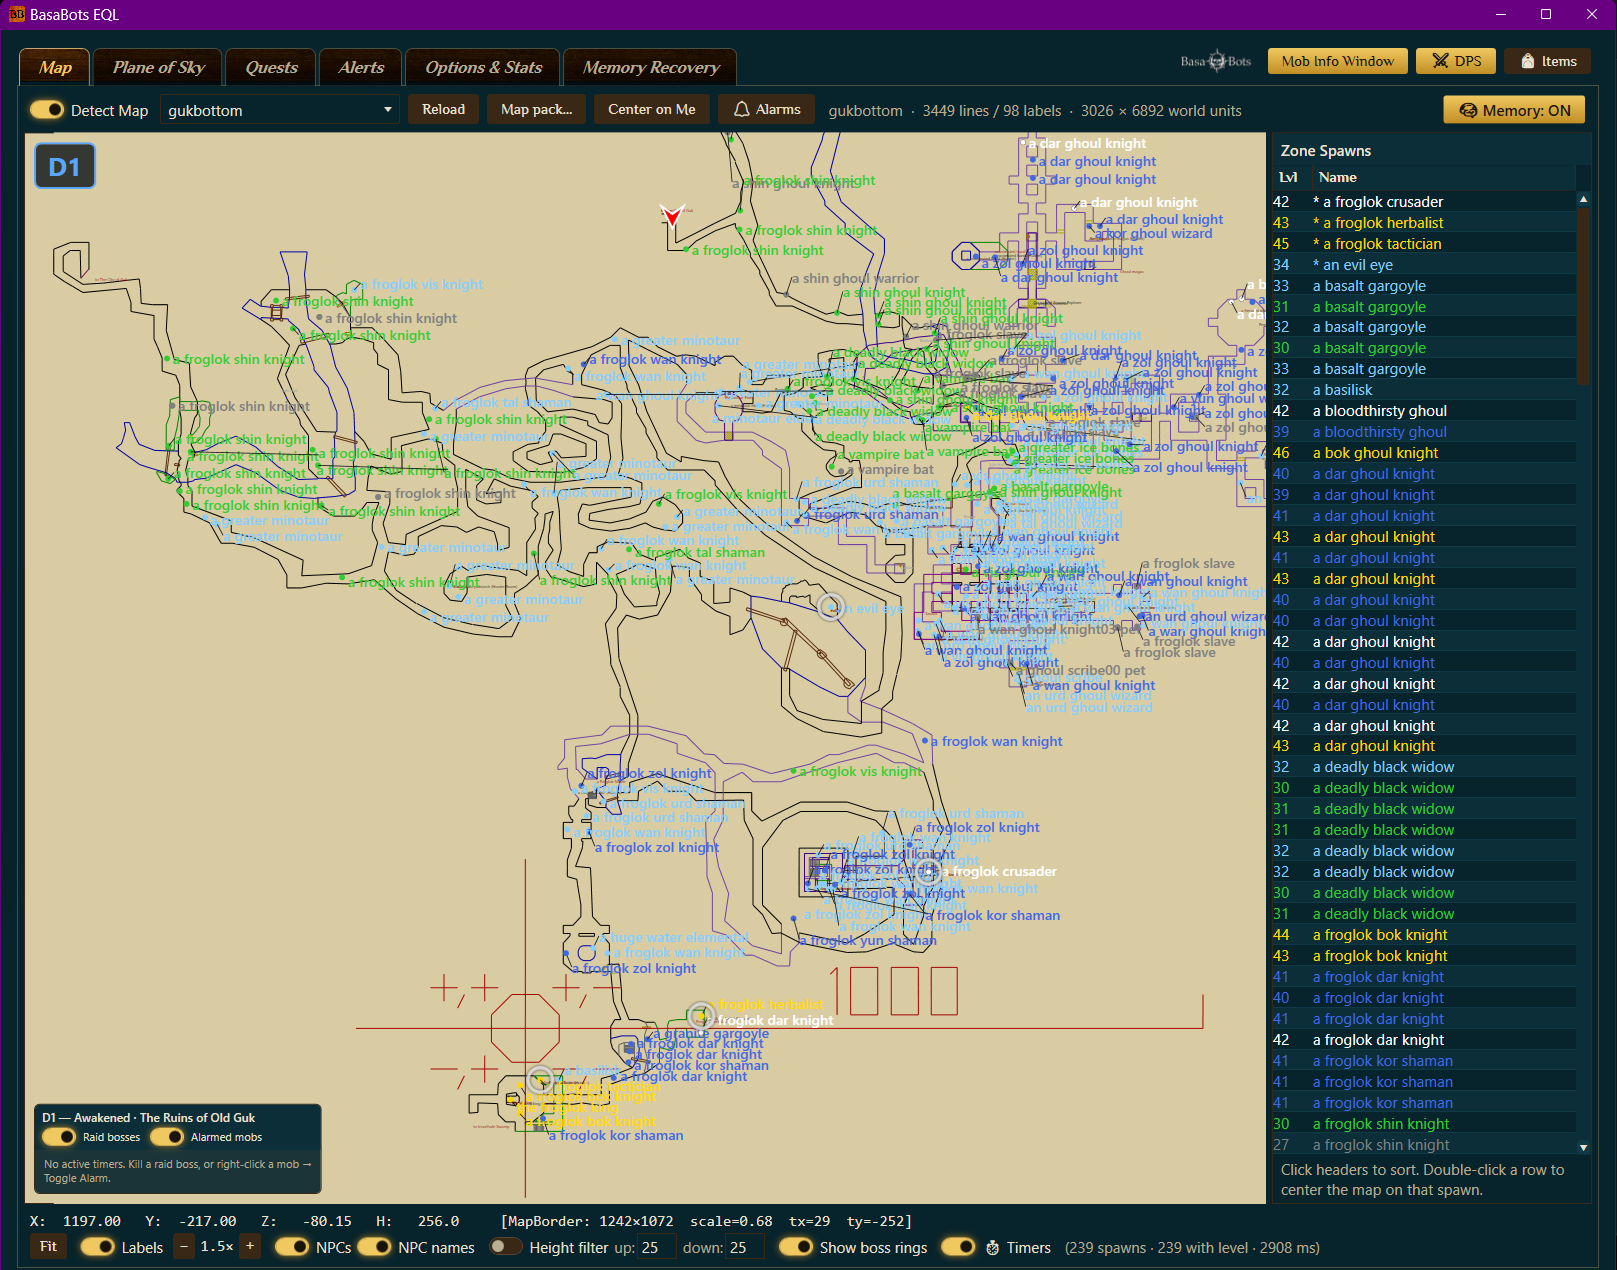
The map shows your whole zone at a glance: every NPC and player as a dot, colored from gray to red by their level relative to you, so you read the room instantly. It keeps up as you walk and switches zones with you automatically. A height filter fades out-of-range mobs so crowded, multi-level dungeons stay readable, and a live Zone Spawns list mirrors everything on the map in a sortable table. It pops out into a floating window over the game, and there's a dark mode for night sessions.
2. How it works
The zone outline itself comes from map files on disk, so it draws the moment you open the Map tab. The live parts, your own position dot, the spawn list, and your vitals, come straight from the running game so they always reflect where you actually are.
Those live parts are controlled by the 🧠 Memory button at the right of the toolbar, and it's off by default. Switch it on and your dot appears, the Zone Spawns list fills, and the map starts following you. If the map shows the zone but no dot or spawns, that button is off.
3. UI overview
Top toolbar

- Detect Map: when on, the map auto-loads and switches whenever your character zones in-game. Leave it on and the map follows you zone to zone. Turn it off to pick a zone by hand from the dropdown.
- Zone dropdown: the zone the map is showing. Driven automatically when Detect Map is on; pick one manually when it's off.
- Reload: redraws the current zone map from disk.
- Map pack...: choose which map-pack folder to draw from (the same brewall-style packs EQ's own map window uses).
- Center on Me: a toggle. On, the map auto-pans so you stay centered; drag the map by hand to turn it off.
- 🗺 Pop-out Map: pops the map into its own floating window you can drop over the game. Covered in section 5.
- 🔔 Alarms: the Alarms & Highlights editor: the mobs (and players) you want called out, their ring colors and chimes. Covered in section 5.
- 🧠 Memory: ON / OFF: the live game connection, described above. It's off by default; flip it on for your live position, the spawn list, and your vitals.
Zone Spawns list
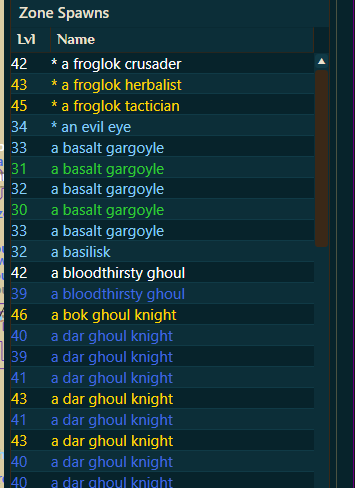
- Every spawn in the zone, listed by level, name and type, con-colored to match its dot on the map.
- Click a column header to sort, double-click a row to center the map on that spawn, and use the Search box to pick a name out of a crowded zone.
- Show enemy HP (on by default) tints each row by how much health the mob has left, so a full mob stays clean and one you're fighting fills in as it drops. Health tracks across the whole zone about once a second, so you can watch a puller's mob come down without targeting it.
- The list and the map are the same data two ways: handy when a name is easier to find in a list than a dot is to find in a crowd.
Bottom control bar

Above the controls, a readout shows your live X / Y / Z position and heading. The controls themselves:
- Fit: reset zoom and pan to fit the whole zone.
- 🌙 Dark mode: repaints the map on a charcoal background with light lines, including the thin leader lines that run out to a crowded mob's name label. Easier on the eyes at night, and your choice is remembered.
- Labels: show or hide the map's text labels (zone landmarks), with a − / + to size them.
- Zoom (the − / value / +): zoom the view in and out.
- NPCs: render every detected spawn as a dot.
- NPC names: show the name next to each dot. Turn this off in a crowd to de-clutter.
- Height filter (up / down): fade mobs and map lines whose height is outside this many units above or below you, so a multi-level dungeon shows just your floor. Default 10.
- Show boss rings: on by default, draws a flashing ring and a * on every mob flagged as a boss. Turn it off in zones like Hate, Fear, or Sky where the heuristic trips on everything.
- Timers: show the spawn-timer overlay (countdown bars for raid bosses and alarmed mobs).
- The readout on the far right shows the live spawn count.
4. Basic use: read your zone
Step 1. With the game running, click the Map tab. With Detect Map on, your current zone draws automatically.
Step 2. Turn on 🧠 Memory in the toolbar (it's off by default). Your position dot appears and the Zone Spawns list fills in.
Step 3. Click Center on Me. The view snaps to your position and follows you as you move.
Step 4. Read the dots. Gray and green are far below your level, blue and white are near it, yellow and red are at or above. The same colors appear in the Zone Spawns list.
That's the everyday loop. Below are the two features people reach for once they're comfortable.
5. Advanced use
Tame a multi-level dungeon with the height filter
In a place like Old Guk or any vertical zone, the map can show three floors of mobs stacked on top of each other. Set the Height filter up / down values (for example, 25 and 25) and the map fades anything outside that vertical band. Now you see your floor, and only your floor, which makes pulls far easier to plan.
Right-click a mob to act on it
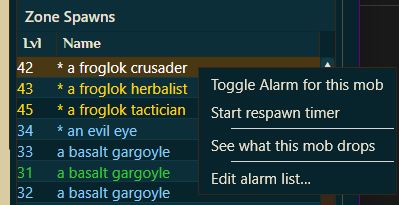
Right-click any spawn, on the map or in the Zone Spawns list, for its actions:
- Toggle alarm tracking: get called out, with a sound and a colored ring on the map, when this spawn appears. Click again to stop tracking it.
- Toggle silent tracking: the same colored ring with no sound, which is what you want when you're farming a spot and don't need to be told every pop. If the mob is already an audible alarm, this switches it to silent.
- Start respawn timer: type how long until this mob is back (mm:ss). It's remembered for that mob in that zone, shows in the spawn-timer panel, and chimes when it pops.
- See what this mob drops: jump straight to its loot table in the lookup tool.
- Edit alarms & highlights...: manage everything you're tracking in one place.
Alarms & Highlights
The 🔔 Alarms button opens the full editor for everything you're watching for. Each entry is a name to match, and you choose what happens when it appears:
- All zones: tick it and the alarm stays armed wherever you go, instead of only in the zone you added it in. It works for player names too, so you can be told when someone shows up regardless of where you are. All-zones entries sit at the top of the list, so you can always see what's still listening.
- Highlight color: the ring color drawn around that mob on the map, so two things you're watching for don't look alike.
- Rename in place: the name in the list is editable, and the name is what gets matched, so fixing a typo fixes the alarm.
- Your own chime: Options & Stats → Alarm sounds sets the tone for named spawns, soft camp pops, and charm breaks separately, from the built-in chimes or any
.wavof your own, with a ▶ Test button for each.
Pop the map out over the game
🗺 Pop-out Map lifts the map out of the main window into a lightweight floating one you can drop straight over EverQuest, which is the difference between using this on one monitor and needing two. It keeps the parts that matter in a small frame: mob dots, your position, the height filter, label zoom, and center-on-me. Resize it, pin it above the game with 📌, freeze its position with 🔒 so you can't nudge it mid-fight, and drag its transparency (α) down until it sits lightly over the world. It has its own 👤 button to turn the names beside each dot on and off (hiding the name and the line drawn out to it, leaving just the dots), and the zone's own map labels stay on the separate 🏷 button. Alarm highlight rings show here too. Click the toolbar button again, or close the window, to put it away.
Where to next
Want help reading a particular zone or setting up camp alarms? Drop into the BasaBots Discord. Or jump in: